Managing subscribers
To make managing subscribers easy for you FreshMail offers a few functionalities that let you keep your mailing lists clean and uncluttered with unresponsive addresses. The database you use for your FreshMail campaigns is the only cost generator you have so it’s worth taking care to make sure that it only includes subscribers that can deliver the results you are looking for.
Thanks to the following functions you can save time and money and maybe even avoid a few headaches.
Where you can find lists?
To find the functions described here, just open the 'Contact lists’ tab.
Beside 'Create list' button you will find two additional functions:
- a subscribers browser that will find a given address on every list you have uploaded to the system
- a functionality allowing you to block a subscriber

Blocking unwanted subscribers
You can use the blockade to make sure that your messages will not be sent to a given address or domain. This helps to avoid any confusion or misunderstanding in a situation when someone does not want to receive messages from you.

Database browsing
This can be useful when you want to check the status of a recipient on different lists or restore a recipient to the list from which he has previously signed off and now wants to sign up to again.

While browsing through the recipients you can mark the checkboxes that can be found next to the address and delete it or add a status.

Importing a mailing list
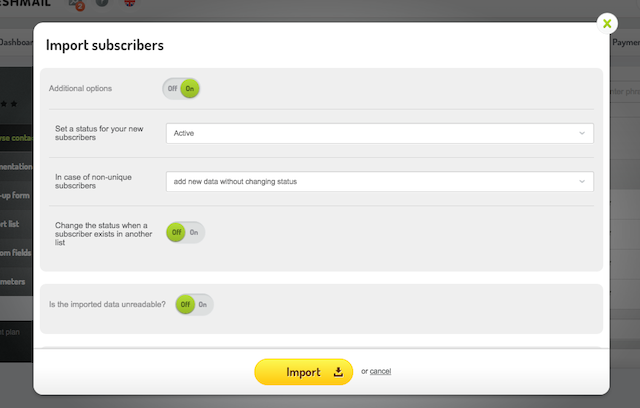
The final functionality concerns importing mailing lists. Let’s say that you have a few databases on your account and you want to upload a new one. There is a possibility that the addresses you add already exist on one of the other lists. Some of the addresses could be signed off and some could have a ‘bounced’ status. If you import a list in the usual way all the subscribers will have an ‘active’ status and there is a chance that the next campaign will be sent to someone who has already signed off from the list. On top of that, you will generate unnecessary costs by sending messages to inboxes that have previously ‘bounced’.

To avoid this, all you need to do is set up the option to identify the status of an address that could already be in your database. Choose ‘yes’ in the ‘change status’ option. You will see the list of statuses. By marking the checkbox next to the status you will enable the option of comparing a newly uploaded list with previously uploaded lists on your account. Any duplicate addresses will automatically be given the same status that already exists on the other subscriber list where the address already appears. Using this feature keeps your subscriber lists in good condition and avoids any confusion regarding which addresses are useful to you.
Check as well: How to import subscribers into your contact list

