 Renata Gajoch-Bielecka
created
How to create email-based courses with FreshMail autoresponder
Back to list of articlesEmail courses, a series of instructional or educational lessons, are becoming a very useful and valuable kind of content. They are convenient since each installment is automatically sent and the content is divided into easily digestible parts. Autoresponder mail-based courses can be a great addition to your marketing strategy and I’m going to show you exactly how to do it!
You’ll learn:
- Why online courses are useful both for companies and subscribers
- How to run surveys to identify possible course subjects
- How to design the course to meet technical specifications of email marketing
- How to create a series of messages using autoresponders that automatically regulate when pieces of the course are sent
So let’s get started by stressing that email courses are still valuable marketing tools despite being already familiar to many of us. Make them part of your marketing strategy today!
Why email courses are worth organizing
Everybody can put together an email course today. It’s a great way to enhance your content and marketing activities. Email courses are an attractive complement to the usual reports to download and newsletters to share.
Let’s run through just some of the advantages:
- When signing up for a course, the subscriber knows that you will be sending regular emails to him, something that’s not always clear when you share an ebook.
- Starting an email course requires a confirmation of a subscription and thus increases the quality of active leads in your database.
- Regular emails remind recipients about the course and make it easy to review the content at any time.
- Email courses suggest a greater degree of preparation and value than an ebook or video. They’re not just “regular” content.
- Creating email courses enhances your image and authority because anyone who teaches others, by definition, must know what he’s talking about.
- You can use autoresponders to plan each stage in advance. This means that you can set up it and let the system take care of the rest while you move on to something else.
That should be enough to convince anyone but we’re just getting started. Setting your own email course might take a little time and effort but it’s definitely worth it. Ready to see how to do it?
Plan your course
The first item on your to-do list is choosing a topic. It needs to address the needs and expectations of your subscribers, which you can discover through research and surveys.
Conducting effective research
Be sure about the value of the content you create by spending the time needed to find out what your audience wants. Be sure that any assumptions you have are correct. This not only helps you to get all the details right but you also spark interest among subscribers before the content becomes available.
What are your options for learning more about what subscribers want?
Thanks to Google Forms, you are able to set up free surveys in just minutes. They help you get a feel for what subscribers think about. Lot of subjects are usually treated as a sincere request for feedback rather than a form of spam.
If you already run a blog or some other form of content marketing, you can check Google Analytics to see what what form of content people are looking for. The numbers don’t lie - you can see exactly what your audience is searching for. Check to see what terms they used to search in Google and use that to craft your topic and keywords.
This is where you can make instant contact with your fans and subscribers. Use it to test the waters and see what gets a response. Ask everyone about what they would like to learn about or share a survey with them. Remember that you can also create survey on your profile or in a discussion group. Another way to use social media to help you select topics for an email course is by analysing hashtags, mentions and topics on profiles and in discussions. Also, keep an eye on the kinds of posts that are shared most often.
What better way could there be to see what’s on the minds of your fans than to read the comments they leave? What kind of feedback is most positive? What’s the general mood? What specific needs do they mention? Get as much information as you can - the answers you need might be right in front of you.
When you log in to your Adwords account, you get access to free key word analytical tools. Use it to help shape the way you will describe your course to match what people are looking for. The difference between, for example, “how to read fast” and “speed reading course” can make a big difference in the number of people that find you.
Quora lets you gather lots of great ideas for engaging potential subscribers. Just look at questions and answers associated with your course and you’ll see what I mean. Try to ask serious questions that will draw interest that can be applied to your email course. You can also be direct and ask what kind of themes and subjects would be most useful in your field.
Using these methods to gather feedback will supply you with plenty to think about when putting your email email course together. Having the information you need to meet your subscribers’ needs and expectations is half of the challenge of being successful!
Prepare your course
Now that you have a subject, it’s time to get started on your content. You already have the knowledge you want to share - preparing your course is all about putting into the right form and structure. To be successful, make sure you...
Communicate credible material
The way you gather materials for your course is always important. Don’t make the mistake of thinking you already know it all and skipping the research stage. It’s always better to make sure you’ve got all the details in order and everything verified, accurate and ready to go. Use credible, authoritative sources in your course, especially if it involves lots of data. Referring to information from institutions enhances your own credibility and helps protect you against making mistakes.
Be familiar with the technical specifications of email marketing tools
Despite being the best online sales channel, email marketing does have certain limitations. You need to know them to be sure that your email course displays in the way that you intended and avoids being labeled as spam. Here are some important tips for this stage:
- Don’t place too much text in your messages since we often read them on the go on mobile devices. Put longer bits of text on your site and link to it in your mail.
- Don’t use too many graphics since they increase the size of the file and the risk that it will catch the attention of spam filters.
- Don’t add any attachments like PDFs or, even worse, video files. All elements beyond the simple graphics and text need to be placed on your website or on a dedicated server.
ProTip:
To increase your message deliverability and open rate, take your engagement with them a bit deeper and ask for a reply to your messages. This not only allows you to increase their activity but your messages will more easily and regularly reach their inboxes.
When your content is ready to go, it’s time to start putting your campaign together.
Do it the FreshMail way - with autoresponders
Advanced email marketing systems let you set up autoresponders to automate your campaigns. Knowing how to best arrange them is the key to success. Let’s take a look at how to use autoresponders to communicate your lessons.
Autoresponder - what it is and what it does
Autoresponders are automatic messages that are sent after a certain condition, or trigger, has been activated. A good example is the message that you get for signing up to a newsletter or other mailing list thanking your for your subscription. It was sent automatically and the trigger was your signing up.
Types of autoresponders you can use
There are a few different autoresponders that can help you to distribute your email course. The best are the:
After the sign-up - Like the name says, this autoresponder confirms someone’s sign up to a subscriber list. It can send the first part of your course to new recipients right after they confirm their subscription. It’s perfect for the first lesson in your series.
After sending another autoresponder - This autoresponder works a bit differently. It’s timed to be sent a certain amount of time after a previous autoresponder or event. That makes the message attached to this autoresponder dependent on earlier emails and if they aren’t sent then neither is this one. It’s helps to keep everything in order lets you plan the sequence of your messages.
Setting up message order
Now let’s turn to getting these autoresponders set up and running. Setting them up is a careful process that requires attention to detail to make sure everything goes smoothly. Don’t rush through this part!
First lesson - after the sign-up
You should get your first lesson out as soon as a new subscriber joins your list. Don’t make anyone wait too long after registering. This is exactly what the after the sign-up is for.
After logging into FreshMail, mouse over the Creator option at the top of the screen and then select Autoresponder from the dropdown menu:

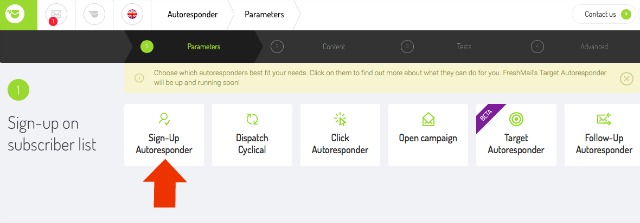
You will see a list of available autoresponder. Select the first one, Sign-up Autoresponder

Now select the list that you want to attach an autoresponder to. It’s worth creating a separate list and giving a detailed name like “Email course”:

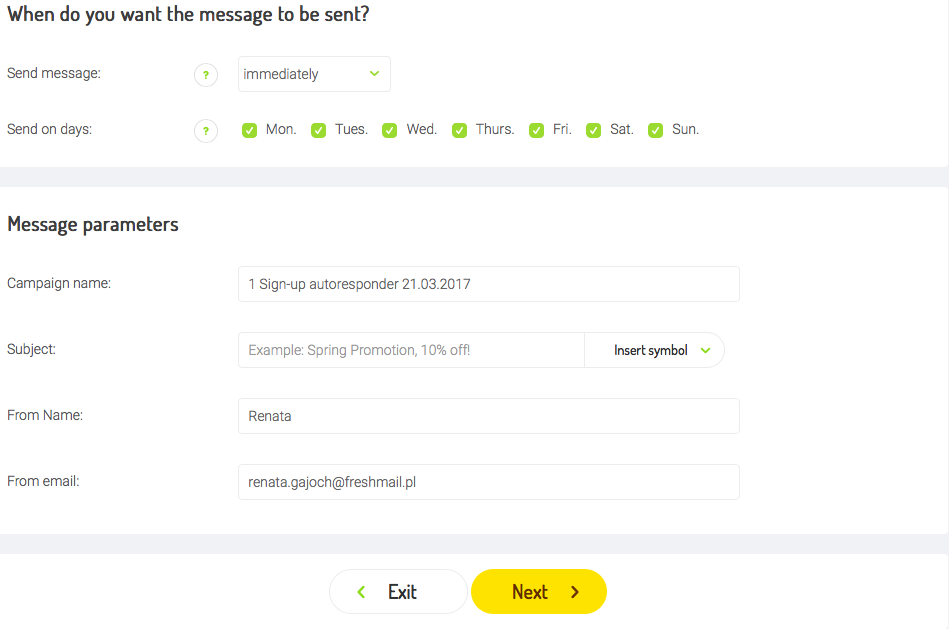
After selecting a list you can adjust the settings as needed, changing the delay after signup, which system should send the message and the standard sender information:

In the next step, select a template or create your own from scratch for the first part of your course. Don’t add any attachments or large graphics, just links and HTML code along with text. Follow the rest of the steps, which are the same for creating any mail campaign.
Click “Run autoresponder” and your first lesson is ready to go!
Second lesson - Follow-Up Autoresponder
After the autoresponder for the first lesson is up and running, it’s time to continue to the course into the second lesson and beyond. As I mentioned, the "after the sign-up" autoresponder won’t be sent until the "forerunner" has been sent. It needs that trigger to activate it. To deploy the second part of the course, mouse over the Creator option again and select the Autoresponder option:

Next, select the last autoresponder on the list:

Click the “Choose autoresponder” option. The same of autoresponders that you saw earlier will appear. The one you choose now will be a follow-up autoresponder. That means it will send the message you are creating now.
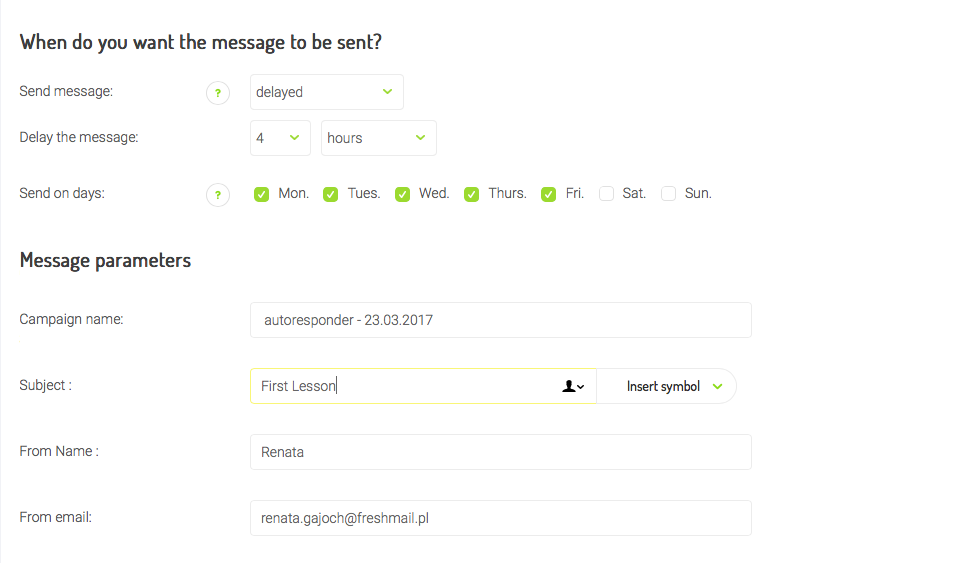
You can also use advanced options like segmentation or decide if the autoresponder should also reach subscribers already on your list. Remember to set the delay and the day of the week when the autoresponder should be sent:

What about the next lessons?
After setting up the first two lessons in the series you can set up any remaining ones. You can set up any schedule you want using the same autoresponders you’ve already deployed. Just arrange for each one to be sent after a delay that you determine after the previous message.
Autoresponder mail - summary
So now you know how to create and run your own email course. Remember to carefully check the autoresponder settings. This will ensure that the campaign runs smoothly and everyone will get exactly the content that you promised that got them interested enough to sign up!

